Showing posts with label baked. Show all posts

Thursday, October 31, 2013

Mexican Chocolate Snickerdoodles


Whether snickerdoodles got their name from German or are a result of New England whimsy, they are a popular cookie in the United States.  Traditional snickerdoodles are a variety of sugar cookie that are rolled in a mixture of sugar and cinnamon before they are baked.  My mother makes some that are excellent, perhaps not as popular in the family as her sugar cookies, but still mighty tasty.  They are chewy and buttery and bursting with taste of cinnamon.  As much as I like those traditional snickerdoodles, I wanted something a little different, something a splash of port or a dram of whiskey might accompany.

Mexican hot chocolate, for those who haven't had the pleasure of tasting it, is made with chocolate and cinnamon.  That being the case, chocolate snickerdoodles seemed a logical mash-up.  For anyone who has nibbled on a block of Ibbarra, these snickerdoodles will remind you of that moment of stolen pleasure.  Crisp, deep chocolate flavor with a hint of heat and spice, these are a cookie for adults.  Kids would probably love them as well, but it may lead them down a dark path.  I'm not suggesting it will lead to heroin or stumbling out of midtown bars at 9 in the morning, but it will change them.  They will suddenly find Barney and Rachel Ray too perky and upbeat.  After eating these, they won't want those overly sweet, insipid store-bought cookies that they beg for like mutant dogs happy for some post-industrial chemical scrap made by indentured orphans in a pollutant spewing factory in a smog blackened city in northeast China.  So it's up to you whether or not you share these with your children.


Mexican Chocolate Snickerdoodles

Cookie Dough
1 3/4 cups (8.75 oz) all-purpose flour
1 stick (4 oz) butter, at room temperature
2 oz unsweetened chocolate
1 egg, room temperature
1  cup sugar
1 tsp baking soda
1/2 tsp baking powder
1/2 tsp ancho chile powder
1/2 tsp cinnamon
2 cloves, finely ground
1/4 tsp salt

Sugar Coating
1/3 cup sugar
3/4 tsp cinnamon
1/4 tsp cayenne pepper

Preheat your oven to 400º F.

To make the cookie dough, melt the chocolate and allow to cool.  Meanwhile, in a large mixing bowl cream the butter and sugar with a mixer until light and fluffy, about 5 minutes.  Stir in the cooled chocolate and the egg and use the mixer to get a homogenous blend.

In a separate bowl, combine the flour and the remaining dry ingredients.  Add this to the chocolate mixture in two or three stages, mixing well to make sure all the flour is incorporated into the batter.
Scoop out pieces of the dough and form approximately 1" balls.  

In a small bowl, stir together the 1/3 cup sugar, the cinnamon, and the cayenne pepper.  Make sure you mix these together well.  Roll each ball of cookie dough in the sugar mix and place on parchment lined cookie sheets, spacing the cookies about 2 inches apart from each other.  Using the bottom of a glass, a bottle of scotch, a saucer, or some other handy object with a flat plane, press down lightly on each ball of dough.

Place the cookie sheets in the preheated oven and bake for approximately 10 minutes.  Slide the baked cookies onto racks to cool.  

Pour a splash of port, a dram of Scotch, or even a glass of hazlenut flavored soy milk and realize how lucky you are and how grateful you should be for this moment, no matter how shitty the rest of your life may or may not be.


Thursday, October 17, 2013

Saffron Pistachio Shortbread


Shortbread is one of those simple, yet satisfying treats.  It is one of those elemental baked goods, taking flour, butter, and sugar and transforming them through the heat of an oven.  This is a recipe that hints of Spain's past.  It is lightly scented and tinted with a healthy pinch of saffron.  It also includes some toasted pistachios.  Like all good shortbread, it is rich and hard to resist, but takes little effort or time to prepare.  I prepared it in the morning before going to class.

The recipe comes from The New Spanish Table by Anya von Bremzen, a cookbook that is full of a great number of good recipes.  She credits Melissa Clark for creating the recipe.  The original recipe calls for toasting raw, shelled, unsalted pistachios.  I simply used dry roasted unsalted ones that I got at Trader Joe's. 


Saffron Pistachio Shortbread
adapted from The New Spanish Table

3/4 cup shelled, unsalted, dry-roasted pistachios
2 cups all-purpose flour
1/3 cup granulated sugar
1/4 cup confectioners' sugar, plus extra for sprinkling on the baked shortbread
1/2 tsp coarse salt
1 cup (8 oz--2 sticks) unsalted butter, chilled and cubed
1 large pinch of saffron, ground in a mortar, steeped in 2 tablespoons of warm water and cooled
1 TBS full-flavored honey

Preheat the oven to 350º F.  Position a rack in the center of the oven.

In a food processor, pulse the flour, sugars, and salt until mixed.  Add in butter, honey, cooled saffron water, and honey, and pulse until the dough just begins to come together.  Place in 9-inch square baking pan.  Press down to fill the pan with an even level of dough.  I find placing a sheet of parchment paper on top and pressing the dough down is the easiest way to quickly fill the pan.  Remove the parchment paper before baking.

Place the pan on the center rack of the preheated oven.  Bake for 35--40 minutes, rotating the pan halfway through the baking time.  Place the pan on a wire rack and let cool for at least 20 minutes before attempting to remove the shortbread.  While the shortbread is still warm, cut it into squares by cutting 6 strips lengthwise and 6 strips crosswise.  This will give you 36 1 1/2-inch squares.

Let the shortbread cool completely before dusting with the reserved powdered sugar.


Friday, August 16, 2013

Peach and Nectarine Tart

After a month in Indonesia visiting family, Tjing and I returned to summer here in Northern California.  It's the towards the tail-end of the season for stone fruits, and peaches and their clean shaven cousins, nectarines,  are at peak sweetness.  Going to the farmers market the morning after we got back, I picked up several pounds of perfectly ripe yellow peaches and white nectarines.  Although they were fine eaten fresh without any adornment, I decided to use some to make this tart which I came across while surfing the web in Java.  I liked the simple directness of the tart, its focus on the fruit, but I thought I'd give it an Indonesian tweak by using some lemongrass kaffir lime pepper jam instead of the red currant preserves it calls for.  I thought a touch of heat with the fruit would be a nice touch.


Other than using demerara sugar instead of white sugar to sprinkle on the fruit, and the substitution of the kaffir lime chili jam for the red currant preserves, I stuck to the Times recipe.  The crust is a straightforward pate sucree, a crust that is pretty much foolproof.  As the fruit is front and center, it's important that you use the best that you can find.  I wouldn't attempt to make this tart with any fruit that you wouldn't be as happy eating fresh. 


I served this with some crème fraìche, as suggested in the original recipe, but a good vanilla ice cream would also go well with it.  It is also fine just on its own.

Friday, December 21, 2012

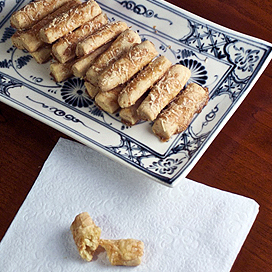
Kastengel--Savory Cheese Sticks


Santa don't want no cookies this Christmas Eve.  All that milk and sugar brings him down with a blood sugar crash, a Christmas day funk that lasts through New Year's.  So this year we're leaving him some kastengel and a glass of thick red wine, or maybe some scotch.

The Dutch didn't leave Indonesia much from 350 years of colonialism.  They were more interested in what they could take from the archipelago than in what they could contribute to it.  One thing they did leave was an appetite for kastengel.  Look at the ingredients and you immediately recognize they did not spring from the Indonesian islands.  Yet, kastengel are a favorite treat to celebrate Lebaran and other major holidays.  Cheesy, buttery, and utterly lacking in nutritional merit, kastengel make tremendous sense as a way to celebrate the end of a month of fasting. 


Kastengel are also a nice change from the overabundance of sweets following Ramadan and during the holiday season in the US.  Cookies are everywhere at this time of year.  Snickerdoodles, ginger snaps, candy cane meringues, almond crescents, and Russian tea cakes abound.  That Santa doesn't slip into a diabetic coma is a Christmas miracle in itself.  Leave a few kastengel in place of the usual cookies and Santa will be pleased.  He may even be extra good to you.


I had never heard of Nyonya Liem or Ibu Liem until Tjing asked me to make some kastengel, but a google search for kastengel resulted in her name appearing again and again.  So I adapted her recipe, simplifying its directions, and translating it into English.  I'm sure the cheddar cheese her recipe calls for is the Kraft processed cheddar that one can find fairly easily in Indonesia.  It makes a more decorative topping of the kastengel as it could probably be baked in a potter's kiln without melting.  A grated parmesan or other relatively dry cheese will produce similar results.  I used a mix of parmesan and a good English cheddar.


Kastengel ala Ny. Liem

I am giving the measurements most Americans are comfortable with; however,  I use a scale when making these as it just makes it easier.  The original recipe calls for equal parts butter and margarine, 150 grams each.

2 cubes butter (8 oz/227 gr), room temperature
6 TBS margarine, room temperature
2 egg yolks
1 tsp salt
3 1/3 TBS (50 ml) half and half
4 oz parmesan cheese, grated
4 oz cheddar/edam/gouda, grated

3 TBS (25 gr)corn starch
5 TBS (25 gr)powdered milk (the original recipe calls for full cream powdered milk, but I used non-fat as that is what is readily available in the US and it worked fine)
3 1/2 to 3 3/4 cups (500 gr) all purpose flour, sifted
1 tsp baking powder

Egg wash of egg yolks mixed with a little oil and water
Finely grated cheddar/parmesan cheese

In a large bowl, cream together the butter, margarine, and egg yolks.  Using a mixer, beat the ingredients for 3 to 5 minutes until light and fluffy.  Beat in the cream to further lighten the mixture.  Add in the cheese and continue to beat until thoroughly mixed in.

In another bowl mix together the dry ingredients.  Slowly add the dry ingredients to the butter/cheese mixture until all the flour has been incorporated.  You will have what looks like a bowlful of crumbly particles.  The dough will not come together until you press it together with your hands.

To make the logs, press together a handful of the mixture and roll it into a rope, like making a playdough snake.  You want the rope to be not quite as thick as an AA battery.  Using an AA battery as a guide, cut the rope of dough into pieces the length of a battery.  Place the cut pieces about 1 inch apart from each other on a baking sheet lined with parchment paper.

Once you have filled a baking sheet with the cut pieces, brush them with the egg yolk wash.  I make a wash with one egg yolk at a time and have found that will usually be enough for one baking sheet (about 50 kastengel).  Sprinkle the finely grated cheese atop the pieces.

Bake in a pre-heated 300º oven for about 20 minutes.  Lower the heat to 200º and bake for another 15 to 20 minutes until the kastengel are cooked through, but not really browned.

This makes a lot.  10 to 12 dozen.  The dough can be frozen.  Bring it to room temperature before attempting to roll it out and make the kastengel.


Tuesday, October 16, 2012

Curried Butternut Squash Tartlets with Maple Bacon Topping


Butternut squash and curry seem to have a natural affinity, as do bacon and maple syrup. Add a ready to bake puff pastry shell, a little brown sugar and cream cheese, and you have a sweet and savory dessert that is ready in minutes.

Peel and thinly slice a small butternut squash.  Saute the slices in butter with some madras curry powder until just softened.  Combine a couple tablespoons of cream cheese with brown sugar.  Spread this on some thawed puff pastry shells that have been rolled out to 5-inch circles.  Overlap about four or five slices of the squash.  Bake in a hot oven for twenty minutes.  Top with crisped pieces of bacon in a reduced maple syrup.  Bake another five minutes.  Remove from the oven.  Cool and serve.  I suppose you could serve with ice cream, but they are awfully good by themselves. A more detailed recipe is below.


Curried Butternut Squash Tartlets with Maple Bacon Topping

1 package of Pepperidge Farm® Puff Pastry Shells, thawed
1 small butternut squash, peeled and sliced into thin slices (1/8 inch thick)
2 TBS butter
3 tsp good quality madras curry powder, divided
8 oz cream cheese, softened
6 TBS brown sugar
4--6 slices of bacon, crisped and broken into small pieces
1/2 cup maple syrup

Preheat the oven to 375º F.

In several batches, sauté the slices of squash in a skillet with the butter and 2 teaspoons of the curry powder.  Cook just long enough to soften the slices slightly, about 3 to 4 minutes.  Remove to a paper towel lined plate and cool.

Stir the brown sugar into the cream cheese, making a smooth, uniform mixture.  

On a lightly floured surface, roll each pastry shell into a circle about 5 inches in diameter.  Place the pastry circles on a baking sheet lined with parchment paper.

Spread 1 to 2 tablespoons of the cream cheese mixture on each of the rolled out shells.  Top with five slices of the butternut squash, overlapping them in a circular pattern.  Bake the pastries for twenty minutes. 

Meanwhile, in a small saucepan stir together the maple syrup and the remaining teaspoon of curry powder.  Reduce the maple syrup by about half.  Stir in the pieces of crisped bacon.

After the tartlets have baked for twenty minutes, top with the maple syrup glaze.  Return the baking sheet to the oven and bake for an additional five minutes.  

When done, remove and cool for at least 15 minutes before eating.  May be served warm or at room temperature.


Tuesday, October 2, 2012

Gingersnaps


Some cookies aren't for kids.  Not that they won't eat them, but they would prefer something less complex, a more straightforward sugar rush.  These gingersnaps would go as well with a lowball of scotch as a glass of milk.  I first made them to use for the base of a cheesecake that I topped with some pineapple, banana, and coconut jam that I recently made. Since the recipe makes two logs, each of which yields 20--24 cookies, I put aside one log in the freezer to bake at a later date.  That date came due last night.

This is a very easy recipe that comes from David Lebovitz, or at least I discovered it on his site.  The actual recipe is apparently from Alice Water's The Art of Simple Food.  I made some slight changes to the recipe, adding cloves and nutmeg, options that the original suggests.  For the cheesecake base, I didn't top the cookies with the coarse sugar, but I do like the crunch it adds to the cookies.  I try to avoid having too many sweets in the house, so I am unlikely to make these very often.  I know if they were in the house, I would be unable to resist them. Anyways, I'm out of scotch.


Gingersnaps

2 cups (280 g) flour
1½ teaspoons baking soda
½ teaspoon salt
2 teaspoons ground cinnamon
1½ teaspoons ground ginger
½ teaspoon ground black pepper
4 whole cloves, finely ground
1/2 freshly grated nutmeg
11 tablespoons (150 g) butter, salted or unsalted, at room temperature
2/3 cup (130 g) sugar
½ teaspoon vanilla extract
¼ cup (80 g) mild-flavored molasses* (sometimes called ‘light’ molasses)
1 large egg, at room temperature

Coarse sugar crystals (I used Trader Joe's Turbinado Raw Cane Sugar) for topping the cookies

In a medium bowl mix together the flour, baking soda, salt, and spices.  With a mixer, cream the butter until fluffy before gradually mixing in the sugar. Add the vanilla, molasses, and egg, and mix until thoroughly incorporated.  With the mixer running, gradually stir in the flour mixture until you have a smooth, uniform dough.

Divide the dough in half.  Roll each half on a lightly floured surface to form two logs, each about 2 inches in diameter.  Wrap each log in plastic wrap and freeze or refrigerate until firm.  (At this point, you may keep the logs in the freezer for up to three months before baking, and you now have something that is every bit as easy to use as those refrigerated cookie tubes you see in the supermarket.)

When you are ready to bake some cookies, preheat the oven to 350º F. Line a baking sheet with parchment paper; one baking sheet should suffice for one log.  If you are expecting company, have a large family, or should be checking yourself into a clinic to deal with your overeating issues, line two baking sheets and get it done with.

Slice the logs into 1/4-inch thick coins of dough.  If topping with the coarse sugar, pour about a quarter cup of the sugar into a small bowl.  Firmly press one side of a sliced round of dough into the sugar.  Place the sugared rounds on the parchment-lined baking sheet(s), sugared-side up.  

Bake for 10 to 14 minutes.  Let cool on the baking sheet for two minutes before transferring to a cooling rack.  Enjoy.


Saturday, March 31, 2012

Baked Curry Puffs


Having made the fried version of these Malaysian curry puffs last month, I wondered how they would be baked rather than fried.  As I pointed out in the previous post on the fried curry puffs, the dough is the same as that used for flaky char siu pastries, which are baked.  I knew these could also be baked therefore, but I didn't know if they would retain the distinctive look of the spiral pastry that the fried version has. Unfortunately, the answer is no.  Although you can still discern the spiral pattern if you look carefully, it is much less pronounced than in the fried version.  The fried curry puffs are also more delicate than the baked version, with an incredible flakiness.  On the other hand, these may be slightly better for you (or not quite as bad for you), and you can bake the whole shebang at once, rather than hassling with heating up the oil to just the right temperature and frying several at a time.
If you are looking to impress for a special occasion, I'd definitely recommend the fried version.  If you want a delectable bite without too much work, try the baked puffs. 


Baked Curry Puffs

Flaky Pastry Dough

Water Dough
1 cup all-purpose flour, plus extra for dusting when rolling out
1 tsp sugar
1/4 tsp salt
1 TBS vegetable shortening or lard
approximately 1/3 cup ice water

Combine flour with sugar. Cut in shortening until mixture resembles bread crumbs. Stir in ice water until the dough is moistened and just holds together when pressed. This may require a little more or a little less than 1/4 cup. Turn the dough out on a floured surface and knead just until the dough holds together as a ball. Wrap the dough in plastic wrap and then form the dough into a circular disk. Refrigerate for at least an hour.

Short Dough
3/4 cup all-purpose flour
1/3 cup vegetable shortening or lard

Cut the shortening into the flour unit mixture resembles coarse meal. Wrap the dough in plastic wrap and then shape the dough into a ball. Refrigerate for at least 1 hour.

After both doughs have been refrigerated at least an hour, unwrap the the water dough and place it on a lightly floured surface. Unwrap the short dough and center it on top of the water dough. Fold the sides of the water dough over the short dough, with the edges overlapping slightly. Press the overlapping edges and both ends to seal in the short dough completely. Form into a rectangle and roll out to approximately 12 x 8 inches. Like folding a letter,  fold the dough in thirds.  Roll out again to a 12 x 8 inch rectangle and fold in thirds again.  Now roll out to a 12-inch square.  Tightly roll the square to form a cylinder with a diameter of about 1 1/2 inches.  Slice into 12 equal rounds.


Chicken Curry Filling

1 potato, peeled and cut into small dice
1 onion, peeled and cut into small dice
12 oz boneless, skinless chicken thighs, chopped into small pieces
2 TBS Madras curry powder mixed with a little water to form a paste
salt, to taste
2--4 TBS coconut milk
2 TBS oil

In a bowl, stir the curry paste into the chicken, mixing well to distribute the curry paste evenly.

Heat a frying pan over medium high heat.  When the oil is hot,  fry the potato until browned on all sides.  Add onions and cook until softened.  Stir in the chicken and enough coconut milk to keep the curry moist but not wet and cook until the chicken is done, not more than five minutes.  Allow the curry to cool before filling the puffs.

Assembling the Curry Puffs

Press each round of dough flat, then roll them into circles with at least a 3 1/2-inch diameter.  Fill the circles with a generous tablespoon or so of filling, fold in half, and crimp the edges closed.  Place the filled pastries on a parchment lined baking sheet and brush with egg wash.  Bake in a preheated 375º F oven for 25-30 minutes, until golden brown.  Cool on a wire rack at least 5 minutes before eating.  May be served warm or at room temperature.


Monday, November 28, 2011

Javanese Nuts and Bolts


Nuts and bolts (AKA Party Mix) is a seasonal snack in my family, something that pops up around this time every year.  Although the recipe makes a generous amount, it disappears as fast as it is put out.  The combination of toasted cereals, pretzels, and nuts with butter and worcestershire sauce produces an incredibly addictive, not too salty snack (although I've always found the packaged versions to be overly salty and nowhere nearly as tasty).  As much as I love the original version (or at least the version that my mother makes), I decided to try giving it a little Javanese flavor.

Instead of butter, I substituted fresh pressed whole kernel virgin coconut oil.  To be honest, I was worried that the coconut oil would overpower the mix.  Fortunately, it proved to be a fairly subtle back note to the mix, not at all overwhelming or cloying.  In addition to the coconut oil, I added some crisp tempe, some fried kaffir lime leaves, and some fried, finely chopped lemongrass.  Instead of using worcestershire sauce, I used kecap manis, some fish sauce, and some panang curry paste.  Although not my mother's party mix, this proved to be just as addictive.  If you're looking to give a different twist on an old standby, I'd certainly recommend giving this a try.


Javanese Nuts and Bolts

2 stalks of lemongrass, inner lower third only, very finely chopped (easiest to do in a food processor)
14 kaffir lime leaves

2 cups bite-size wheat square cereal (such as Wheat Chex®)
2 cups bite-size corn square cereal (such as Corn Chex®)
2 cups bite-size rice square cereal (such as Rice Chex®)
2 cups toasted oat cereal rings (such as Cheerios®)
2 cups pretzels
1 1/2 cups lightly salted dry roasted cashews
1 1/2 cups tempe sliced into pieces 2" x 3/4" x 1/3" and deep fried until crisp

1 cup fresh pressed virgin coconut oil
1/4 cup kecap manis
1 TBS fish sauce
2 tsp panang curry paste

Preheat your oven to 225º F.

In a pan over medium low heat, fry the lemongrass in several tablespoons of the coconut oil until browned and crisp, like when making tofu with lemongrass.

Fry the kaffir limes in hot oil until crisp.  Alternatively, crisp in a microwave.  You want to be able to crumble them easily.

Heat the remaining coconut oil in a small saucepan.  Stir in the curry paste until it is dissolved in the oil, and then stir in the kecap manis and fish sauce.

In a large bowl mix the cereals, pretzels, cashews, and fried tempe.  Pour in the coconut oil mixture. Mix well, tossing and stirring the cereals so all get coated.  Stir in the browned lemongrass and the crumbled kaffir lime leaves.  Mix well and pour into a large roasting pan.

Bake in the preheated oven for about an hour, stirring every fifteen minutes or so.  Cool before serving.

I've found the kaffir lime flavor to become more pronounced the longer the mix sits.  This is a flavor I think can be overbearing--as I find it is in Trader Joe's Thai-spiced cashew nuts.  You can taste the kaffir lime leaves in this mix, but they don't dominate it. 

Friday, November 4, 2011

Vietnamese Coffee Crack Pie


Having heard so much about Momofuku's infamous crack pie, I decided I'd make it for a recent bookclub dinner.  Essentially a variation of chess pie, Christina Tosi's crack pie is a rich, extremely sweet dessert; click on the recipe for it and a rash of links to diabetes control and information websites appear.  Had Jerry Garcia survived the heroin, this would have been his demise.  Give an eight-year old a suggested serving sized slice of this and pull him down from the ceiling eight hours later.


Reading the recipe for crack pie, I thought it seemed sweeter than something I would normally choose.  Still, I didn't want to just say no. I made Tosi's crack pie following her recipe verbatim.  It produced a luscious, enticing pie that everyone else in the bookclub enjoyed.  However, it was too sweet for my taste.  I loved the crust and the filling was wonderfully creamy and silky, but it was like mainlining sugar.

In as much I drink my coffee straight--black, no sugar, no milk--I still had some sweetened condensed milk in the fridge from making the Vietnamese Coffee Ice Cream.  Hoping to make a pie that had the silkiness of Tosi's filling without quite so much sweetness, I decided to try a coffee flavored version of crack pie using the sweetened condensed milk.  The milk substituted for the cream and white sugar called for in the original recipe.


Vietnamese Coffee Crack Pie
printable recipe

1 prepared crust following Tosi's recipe
(I used a 9-inch tart pan with a removable bottom)

Filling

3 1/2 oz light brown sugar (about 7 TBS)
1/8 tsp salt
a scant 3 TBS milk powder
1/2 cup (1 cube) melted butter
1/4 cup espresso or strongly brewed coffee
1/2 cup sweetened condensed milk
4 large beaten egg yolks
1/2 tsp vanilla

Heat the oven to 350º F.  Place the pan with prepared pie crust on a large baking sheet.

In a large bowl, whisk together the brown sugar, salt, milk powder, butter, espresso, and sweetened condensed milk until you have a fairly homogenous mixture.  Gently whisk in the egg yolks and vanilla without whisking in too much air.

Pour the filling into the prepared crust.  Bake for 15 minutes at 350º, then lower the temperature to 325º and bake until filling is just slightly wobbly.  This took around 15 to 20 minutes for the coffee filling, which has more liquid than Tosi's original filling. When done, remove and cool on a rack.

Refrigerate for several hours.  Sprinkle with powdered sugar.  Slice and serve.
Tosi's recipe says each pie makes 6 to 8 servings.  I'd suggest 12 slices per pie.


Tuesday, October 25, 2011

Kue Soes Kopi Kapulaga--Cardamom Coffee Cream Puffs


As my blog is entitled Javaholic, many people assume that I focus primarily on coffee.  As much as I enjoy a good cup of coffee, which I do several times a day, this blog is more interested in exposing people to Indonesian food. However, after having gone more than two years without a post specifically related to coffee, I find myself having two coffee related posts this month.
 
When the Foodbuzz Tastemaker program offered interested bloggers a chance to create a post about a dish that would pair with some new blends Peet's was promoting, I leapt at the opportunity.  For one thing, I got two bags of Peet's coffee from the deal.  Yes, I can be had cheap.  I wouldn't have done it, however, if Peet's weren't already my choice for coffee.  It seems to be one of the few places where I can get a good cappuccino that is not just a frothy latté.  I also appreciate that it uses a lot of Indonesian textile motifs in its decorations.


The new blends--Café Domingo, which is a blend of Central and South American coffees, and Café Solano, which is a blend of African, Indo-Pacific and South American coffees--are medium roasts. Interestingly, Indonesian coffee drinkers tend to favor medium roasts.  During my visit to Kediri this past summer, my brother-in-law couldn't appreciate the dark roast Sulaweisi I brought, preferring a medium roast from Flores.  He would definitely appreciate the Café Solano.

I don't generally drink much coffee past noon, but I do enjoy it sometimes with dessert.  As one of the desserts that Tjing likes is kue soes, which is what Indonesians call cream puffs, I decided to make some with an Indonesian spiced pastry cream.  Topped with a simple dark chocolate sauce, these pair very nicely with the medium roast blends.


1 cup of bread flour (although all-purpose will also work)
1 TBS sugar
1/4 tsp salt
3/4 cup milk
1/4 cup water
1/3 cup butter (5 1/3 TBS) 
4 large eggs (at room temperature)

Sift together the flour, sugar and salt.  In a medium saucepan bring the milk, water and butter to a boil over medium heat.  As soon as the liquid comes to a boil, dump in the flour mixture and stir well to form a soft dough.  Off the heat, stir in one egg at a time, making sure that each egg is thoroughly incorporated before adding the next egg.  By the time the last egg has been incorporated, the dough should be satiny and smooth.  Using a pastry bag or two tablespoons, place twelve balls of dough on a parchment or silicone lined cookie sheet.  Bake for ten minutes at 400º F, then lower the oven to 350º F and bake another 20 to 25 minutes until golden brown.  Cool before filling.

Cardamom Coffee Pastry Cream

1 1/4 cups whole milk
1/4 cup espresso
1/2 cup sugar
4 egg yolks
3 TBS corn starch
the seeds from 4 cardamom pods, finely ground in a mortar
1/2 tsp freshly ground nutmeg

Whisk together the egg yolks with the sugar until light and creamy.  Stir in the corn starch, making sure there are no lumps.  
Meanwhile, bring the milk, espresso, cardamom and nutmeg to a boil.  Pour the hot liquid into the egg yolk mixture while whisking steadily to temper the eggs.  Then add this back to the rest of the milk in the pan and stir over low heat for several minutes until it thickens.  Chill the pastry cream until you are ready to fill the cooled puffs.

Dark Chocolate Sauce

1/2 cup light corn syrup
1 cup whipping cream
8 oz dark chocolate (I use Trader Joe's) finely chopped

In a small sauce pan heat the corn syrup and whipping cream just until it comes to a simmer.  Pour over the chopped chocolate and stir to melt the chocolate.  Drizzle warm over the filled cream puffs.
Enjoy with a cup of coffee or the beverage of your choice.


 I'd like to thank Foodbuzz and Peet's for the coffee and coupons they sent me for taking part in this promotion.  


Tuesday, October 18, 2011

Olive Oil Pound Cake with Almond Meal


While my wife and I share similar tastes for most savory dishes, desserts are another matter.  I have a weakness for butterfat.  The higher percentage of butterfat in a dish, the more likely I am to love it.  My wife, however, has an aversion to butterfat.  Shortbread cookies--no.  Croissants, proper ones--no.  Traditional pound cake--no. My mother makes a very good traditional pound cake rich with eggs and butter.  I love it, but Tjing doesn't care for the buttery richness. Desserts are a cultural divide that finds us on two distant shores.  This olive oil pound cake helped us bridge that distance.

Catherine, a local blogger who is very active in the Sacramento food scene and is the author of Munchie Musings, helped organize a dinner for Sacramento bloggers at the Greek Village Inn last month that was also a promotional event for Star Fine Foods who wanted to showcase their release of a 100% California olive oil.  Besides a nice chance to meet and interact with some other local bloggers while enjoying a delicious Greek meal (Tjing also can't stand the smell of lamb, so any time I have it is a rare treat), I came away with a bottle of olive oil (the regular extra virgin--not the California terroir).  As fond as I am of butter, I did think this made a delicious pound cake, one that you could almost feel righteous in eating, good fat vs bad fat and all that.  Most importantly, it tastes good.


1 1/4 cups (160 gr) all purpose flour
1/2 cup (50 gr) almond meal
2 tsp baking powder
1/8 tsp salt
1 cup sugar
4 eggs, room temperature
3/4 cup olive oil
finely grated zest of one lemon
1 tsp almond essence

Preheat the oven to 350º F.  Grease a 9" x 5" loaf pan.  You may line the bottom with parchment paper if you wish.  (I found it slightly easier to remove the cake when the pan had the parchment paper, but not that difficult to remove it without the parchment paper.  I use a pyrex glass pan, and I think I liked the crust a little more on the loaf without the parchment paper.)

Sift or stir together the flour, almond meal, baking powder, and salt.

In a large bowl set over a pan with about an inch of hot water, beat the eggs and sugar together until the volume nearly triples.  The mixture should be the consistency of whipped cream just before it gets to the soft peak stage.

Carefully fold the dry ingredients into the egg mixture by sprinkling the flour mix over the top little by little and stirring it in.  Add the olive oil, lemon zest, and almond essence, making sure to stir well to keep the oil from pooling in the bottom of the bowl.  Pour the batter into the prepared loaf pan and bake for 40 to 50 minutes until the cake is a golden brown and a skewer inserted in the middle comes out clean.

Let cool in the pan for five to ten minutes, then remove and cool on a rack. 


Tuesday, September 20, 2011

Cherry Tomato Clafoutis


I first encountered Patricia Wells while working in Sungei Besi refugee camp in Malaysia.  Having little else of interest to read, I would read every inch of the International Herald Tribune, including the financial news and coverage of test cricket, two subjects I remain woefully ignorant of.  Patricia Wells' articles came out once or twice a week as I recall. 


While almost all the writing in the paper was of a very high standard--even the cricket coverage could be compelling--I particularly enjoyed Wells' articles.  Mostly reviews of Parisian eateries, her writing was informative and informed.  When she praised a particular chef's handling of bouillabaisse, she placed it within the context of other chefs' treatment of the dish, not only pointing out the differences, but explaining why each chose the approach they did.  It was obvious when reading her that Wells had a great knowledge of and keen passion for the food she wrote about.  Living on a $500 a month salary, working in a rather bleak refugee camp on the outskirts of Kuala Lumpur, I found myself transported to the bistros and restaurants Wells assayed in her articles.


Although I tend to cook mostly Asian food and thus my collection of cookbooks skews towards recipes from those countries, I do have a handful of other cookbooks I enjoy.  For French and Italian food I am partial to Wells and Joyce Goldstein.  Both authors not only write clear, tasty recipes, but also include information on the background of the dishes and useful tips along with a clean prose style.  I have seldom been disappointed in any of the recipes I have tried from either of these authors.


Having stopped by the Mien strawberry stand down the street from my house, I discovered they had these brilliant jewels of cherry tomatoes little bigger than peas.  Once I saw them, I decided I'd have to find a way to use them.  This recipe for cherry tomato clafoutis is adapted from Wells' recipe for tomato clafoutis from Patricia Wells at Home in Provence.  Larger cherry tomatoes would work just as well--and be a lot less time consuming when halving and salting.  Wells recipe (which I halved) calls for baking the clafoutis in a 10 1/2-inch round baking dish. 


1 1/2 cups cherry tomatoes, halved
fine sea salt
1 large egg
1 large egg yolk
3 TBS heavy cream
1/4 cup freshly grated Parmesan cheese
1 tsp fresh thyme leaves

Preheat the oven to 375º F.

Place the halved tomatoes in a colander, cut side up.  Sprinkle them with the salt.  Set aside for 30 to 60 minutes to allow the salt to draw the liquid from the tomatoes.  Then place the tomatoes in a bowl lined with paper towels. 

In a small bowl, bet together the egg, yolk, cream, half the cheese, and half the thyme leaves.

Divide the tomatoes between two four-inch ramekins.  Pour the batter over the tomatoes.  Top with the remaining thyme and cheese. 

Bake in the oven until the batter is set and the clafoutis is golden.  Serve warm or at room temperature. 


Tuesday, April 12, 2011

Oatmeal Streusel Ginger Berry Bars


Although my father was always a National League fan when it came to baseball, my mother adheres to Ted Williams' philosophy when it comes to freezing food.  Nothing can be frozen too long.  Roasts that were calves when Ted Williams still walked this earth reside in the back recesses of my mother's freezer, bargains that proved irresistible when the family still gathered for Sunday roasts. A bargain at today's prices will seem even more so when discovered a few years hence, shadowed with freezer burn perhaps, but still "perfectly edible."


Like my father, I am a fan of National League ball, the World Champion San Francisco Giants to be precise.  But like my mother, I tend to use the freezer like a time capsule.  There are some items that have been there for well over a year.  I believe we have some blocks of sauce for gado gado that we picked up when we were in Indonesia a half dozen years ago.  It's not that I am stocking up on bargains, but I sometimes don't get around to cooking something right away, so I shift it to the freezer.  Fortunately, we don't have a stand-alone freezer, so I am limited to what I can entomb.


I had had a bag of mixed berries from Trader Joe's in the freezer for some time.  I don't think they were as old as the bumbu gado gado, but I wouldn't testify to that under oath.  The berries seemed to have passed through several partial warming ages also, and the bag was half ice crystals when finally opened.  Still, they were perfectly edible, and featured prominently in these berry bars I made for Tjing's most recent knitting session.  

Oatmeal Streusel Ginger Berry Bars 

1 1/2 cups old fashioned rolled oats
1 1/2 cups all purpose flour
1 cup brown sugar
3/4 cup butter, softened and cut into small pieces
1/2 tsp baking soda
1/2 tsp salt 

1  16 oz. bag of frozen mixed berries, thawed
juice and zest from half a lemon
1 TBS fresh ginger, finely grated
2 TBS corn starch 

Preheat the oven to 350º F.

Mix the oats, flour, sugar, baking soda, and salt together.  Cut the butter into this mixture.  Reserve a third of this mixture.

Line a 9" x13" pan with baking parchment, leaving several inches on each side to enable you to lift it out later.  Press the bulk of the oatmeal mixture into the parchment lined pan.  Bake in the pre-heated oven for ten minutes.  Remove and allow to cool.


While the base is baking, prepare the berry filling.  In a saucepan simmer the berries,  lemon juice, zest, sugar and ginger for about eight to ten minutes.  Mix the corn starch with a little water to form a slurry.  Stir this into the berry mixture and simmer for another couple of minutes, until the mixture thickens.  Remove from heat and allow to cool slightly.

Pour and spread the berry filling over the cooled base.  Sprinkle the reserved oatmeal streusel mixture atop the filling.  Return the pan to the oven and bake for 20 to 25 minutes until golden brown.

Lift the parchment paper out of the pan and allow to cool completely on a wire rack before cutting. 

Sunday, March 27, 2011

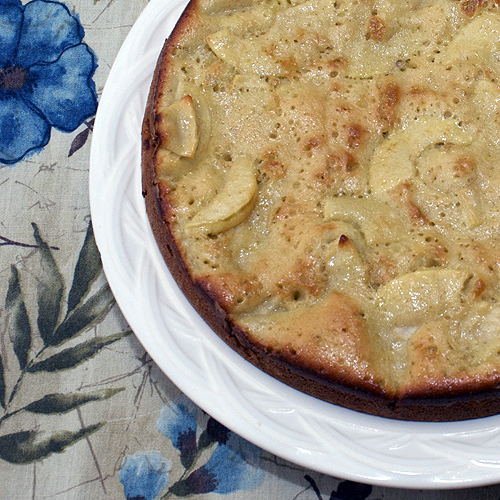
An Apple Cake from Kyrgyzstan

One of the benefits of being an ESL teacher is that students sometimes share foods and recipes from their native countries. We usually have a potluck about once a semester, and some days students just happen to bring in some food to share.  Whenever there is a dish I particularly enjoy, I do my best to get the recipe from the student.  As I generally teach the lower level learners, from literacy level to beginning low, this can sometimes be a challenge.  Occasionally, as with this recipe for apple cake, the directions are simple and straightforward enough that writing the recipe is not difficult at all.

Until recently I had been teaching a small group of students in a makeshift classroom on a troubled high school campus.  The idea behind the class is that I would teach the parents of struggling students who would then realize the value of education.  Unfortunately, most parents who have children who aren't doing well in school probably don't really give a damn.  And the majority of those parents are native speakers of English.  Many immigrants may be struggling with the language, but one of the primary reasons they have come to the United States is get an education for their children.  Among the few students the class attracted, one was a parent of a child at the high school. Ironically, Fatimah--not her real name--recognized the school was not very good and was doing all she could to get him transferred to another school. 


Fatimah is a middle-aged woman from Kyrgyzstan.  Her father was Tartar and her mother Russian.  In Kyrgystan she was a businesswoman, operating a shop that sold Swarovsky crystal.  Although her husband has been here several years and is currently working on an MA at the local university, Fatimah and her children have just been here since last August. 

Most of the nearly 300,000 Russian speaking immigrants in the greater Sacramento area are evangelical Christians.  Although I have had many students from Uzbekistan, Kazakhstan, and Kyrgyzstan (as well as Russia, Ukraine, and Moldova), Fatimah is the first Muslim student I have had from one of the former Soviet republics.  While many students from the northern countries have a dour, almost humorless affect, Fatimah, like many other students I've had from the "Stans", has a very upbeat and cheerful outlook.


Tattoos are rare among the Russian speaking immigrants, save for the occasional crude army tat that some men have.  Fatimah has a prominent abstract tattoo of intertwining geometrical shapes on her left shoulder.  Curious, I asked her about tattoos in Kyrgyzstan.  She told me that while some younger people have them, most people don't approve.  She got hers a few years ago, when her husband was over here and she was still in Kyrgyzstan.  "I like," she said, "so I get.  I don't care what people think.  My husband very surprised when he see. 'Why?,' he ask. I tell him I think it's beautiful, so I get.  I am 35 years old when I get.  I old enough to do what I like. My son not like, no understand.  My daughter happy, smiling, says it beautiful."

Last week this class was shifted to the morning, allowing me to return to a much larger class at the adult school.  Even though I am pleased not to have to travel between schools anymore, not to have to tell students that they couldn't come to class until the school completed a criminal background check on them, not to have to lock up whiteboard markers and erasers, and to have a regular class of more than a handful of students in a real classroom, I felt bad abandoning those students. 

On the last day of the class, Fatimah brought an apple cake she made.  It's one she makes frequently for her family, she said.  Apples, flour, eggs, and sugar, it is made without oil or butter.  Still warm from the oven, it was a delightfully moist, not too sweet cake.  It was a lovely treat on a bittersweet ending to the class. 


Oil-free Apple Cake

3 to 4 apples, peeled and thinly sliced
3 to 4 eggs, beaten
1 cup of all purpose flour, sifted
3/4 to 1 cup of sugar
(I added about 1/2 teaspoon of freshly grated nutmeg)

Preheat oven to 350º F.  Line the bottom of an 8-inch round cake pan with parchment paper.

Mix apples with sugar, using less sugar for sweeter apples, more for tarter apples.  Stir in beaten eggs.  Stir in flour and mix well.  Pour batter into the prepared cake pan.  Bake 30 to 40 minutes, until a toothpick inserted in the center comes out clean.  Cool.  Sprinkle with confectioner's sugar and serve warm or at room temperature.